Oh pie crust!
You were my nemesis
for a long loong time.
But now we have
become friends.
Awe! *Eye flutter*
Learning to properly
roll a pie crust took time
and patience
and some careful
observation.
My Gram (short for
Grandma) is a Master pie maker.
If you were to carry
on a conversation with my Gram,
at the end of it two pies will suddenly
appear.
How did she do that?!
Can you make two
apple pies
while maintaining a
conversation
and eye contact with
someone!?!?
THAT is why she is
the Master.
So I am sharing the
crust rolling secrets of my Super Gram
in this How to Roll a Pie Crust Tutorial!
(And LOTS of pictures!)
Step 1: Make dough
for a double pie crust. If you only need a single
pie crust follow to step 9 then jump over to step 15 to complete.
pie crust follow to step 9 then jump over to step 15 to complete.
You can use
an in-the-box/bag kind, try this butter pie crust recipe or
click here to try this simple pie shell recipe from scratch.
click here to try this simple pie shell recipe from scratch.
Divide the pie dough
into two balls, one slightly larger than the other.
*Insert husband's
joke here*
Step 2: Generously
flour your rolling surface.
You will use close to one cup of flour in the rolling process.
I like to fill a measuring cup with flour and take small
pinches of flour from it as needed.
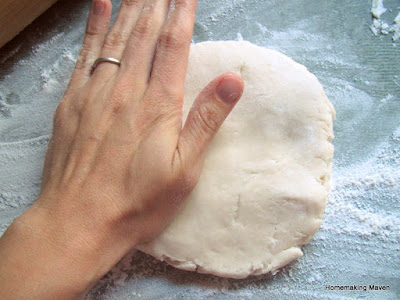
Step 3: Squish the smaller ball of dough, using the
heel of your hand, into a large oval shape.
Step 4: Generously
flour your rolling pin.
Step 5: Firmly and
smoothly roll your pin away from you across the dough oval.
Turn the pin 90
degrees and roll again.
Step 6: Lift the rolled dough, re-flour the rolling
surface underneath, and flip the dough over.
(Flip only once.)
Step 7: Continue
rolling, alternating direction, until the dough is slightly larger than the pie
plate you will be using to bake your pie.
Re-flouring the rolling pin and surface as needed to prevent sticking.
Step 8: Once the
desired pie shell size is achieved, place the rolling pin on one edge of the
rolled dough. While holding the dough on
the pin, slowly roll the pin across the dough.
This will roll the dough onto the pin allowing you to lift it high
enough to place the pie plate underneath.
Step 9: Trim the bottom pie shell to the size of the
pie plate.
(Now is the time to fill bottom pie
shell with desired sweet or savory filling.)
 |
| Click here for this Strawberry Apple Pie recipe. |
Step 10: Roll the second ball of dough in the same manner as the first ball (steps 2-7).
The second dough
ball, being larger, will roll much larger than the first.
This is needed to completely cover the pie
filling.
Step 11: Following Step 8, roll the dough onto the pin
and place over the filled bottom pie shell.
Step 12: Trim the top
pie shell leaving a 1" (one inch) over hang.
Step 13: Lift the
edge of the top shell and tuck into the pie plate. Press down to seal it with the bottom
crust. I like to also press a fork
along the edge as I think it looks pretty.
But that is not necessary.

Step 14: Using a knife cut small slits in the top shell to allow the pie to vent steam while cooking.
Step 15: Follow the
pie filling baking directions.
You did it! You rolled your very
own pie crust!!
Well done you! You deserve a slice
of pie. *wink*
Happy thoughts,


No comments:
Post a Comment