Saturday, 27 February 2016

Cleaning Series: How To Clean the Bathtub


< Singing to the tune of "Sailing, sailing">

Cleaning, cleaning.
Off the tub we go!
Scouring grout without a shout
A shining tub to show...


Isn't cleaning fun?
*smile*
Maybe I'm the only one.

I like to view my weekly scrubbing of the bathtub as exercise.  It's good for me (I sure feel it in my arms and hamstrings some days!).  And good for the tub!  I know that you will likely be able to scrub your tub much faster than I can as my tub has some issues.  First, the grout is almost non-existent.  There are large gaps where the grout should be.  Which means that pink goo (red algae) and mildew like to try and grow on these mini shelves.  Yes we could add more grout and solve the problem but we're saving up to put in an all new bathroom.  We don't want to redo the grout just to pull it all out and bin it in a month's time.  Secondly our tub was neglected (by previous home owners) so the bottom of the tub is stained.  Each week I scrub I am slowly wearing down the stain more and more.  I view it as a game.  How much stain can I scrub out this week!?  I'm also motivated by my husband who is always impressed by how much cleaner the tub looks each week.  Yes he may be pretending to be impressed but I don't care.  Someone noticed my hard work and that makes me happy!

My gross stained tub.

Here's how you too can clean your bathtub in less than 10 minutes:


Supplies (ABCD...)

Abrasive Cleaner - homemade (click here for recipe) or store bought
Bucket
Cloth/sponge/rag
Dish Soap
Gloves (optional)
Old towel
Small container/cup
Squeegee (for glass tub surrounds)
Timer
Toothbrush - re-purpose an old one


How To

Set the timer for 10 minutes.  Squirt a small amount of soap in the bucket and fill with water from the tub.  Set aside.  Start the timer!  It's a race against the clock!  Who will win!?

In 3 Minutes
1.  Remove all toys, soaps, shampoos and other items from the tub surround.  Minimize these items as much as possible.  Algae and mildew like to grow behind and under them.  
2. Using the small container/cup, collect water from the tub faucet and splash it around the tub.  If the tub walls and tub itself are already wet, omit this step.


3.  Dump a small amount of abrasive cleaner on the tub bottom.  Using your cloth/sponge/rag scrub the bottom and sides of the tub.  Scrub around the drain, the tub edges where it meets the wall and scrub the drain plug. 


4.  Using your cloth/sponge (which should now be infused with abrasive cleaner) scrub the tub faucet, tap, and shower head.


In 5 Minutes
1. Pour a tiny pile of abrasive cleaner on the bottom of the tub.  Dip the old toothbrush into your soapy water bucket, then into the cleaner.  Scrub the grout lines between the tub tiles and any soap shelves.  Start at the front of the tub (by the faucet) and work your way up.  This way you clean the dirtiest grout first and work your way up to the least dirty.  Repeat dipping the toothbrush into the water and cleaner as needed.  Spend most of  your 5 minutes scrubbing the grout.

If you have have a glass or vinyl surround on your tub, clean any soap shelves and move on to step 2.


2. Wipe up the last of the abrasive cleaner with the cloth/sponge.  Wipe/scrub the tub surround surface (vinyl or tile).  This can be done quickly using a large wiping motion.

If you have a glass surround wipe it down by dipping your cloth/sponge into your soapy water bucket.   Then wipe with a squeegee to prevent water spots.  


3. If your tub is in a sorry state (like mine!) and there is time remaining, return to the task of scrubbing the tub bottom for a few moments.

In 2 Minutes
1. Using your small container/cup and water from the tub faucet, splash the water against the tub surround and tub.  Repeat until tub and surround are rinsed from all cleaner.


2. Wash any tub toys or shampoo/soap bottles using the bucket of soapy water.  Leave items on tub bottom to dry.
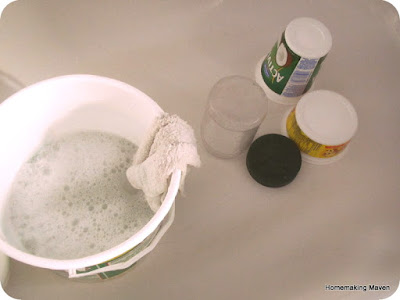
Currently our tub toys are plastic food containers.  Our kids loves filling and pouring with them.


3. Rub the tub faucet,  tap and shower head dry with the old towel. This removes water spots and makes them sparkle and shine!


Yes!
You did it!

You beat the clock!!


You're so awesome.  I knew you could do it!  If you still have time and energy, go ahead and tackle the rest of the bathroom.  It will only take 10 minutes (or less!).  Click here to connect to that article.
Or sit back and enjoy your shiny bathtub.  Love that shine!

Happy thoughts,
Andrea


If you would like to receive regular blog updates
be sure to "Like" my Facebook homepage here:


Thursday, 25 February 2016

How To Make the Best-Ever Oven Fries


I love this recipe.  
It is simple, easy and adaptable.   
Love it!


Can you smell the deliciousness?!
*deep breath in*
Heaven I tell you.  Heaven.


For me these fries are more than fries.  They're more than hot, fragrant, yum-yum-in-my-tum potato fries.  They're a side that my whole family can eat.  Hallelujah!  There seem to be fewer and fewer foods we can all eat as a family.  We have many food allergies.  Argh.  But the mighty potato has always been a friend. *smile*  Baking the fries also gives me peace of mind over deep frying.  I'm giving my kids something they love in a healthier way.  It is also saves on money verses deep frying (the cost of oil).   And it  definitely saves us money verses buying them from the store or a fast food joint.

Old potatoes make GREAT fries.

Ah. 
*happy sigh*
 Potato Fries.
  Are you ready to enjoy all the deliciousness?  
Here's how:


the Best-Ever Oven Fries

Ingredients
7  Potatoes (tennis-ball-size)
1 tbsp Cooking Oil (We use Canola oil)
1/2 tbsp Salt
A couple dashes Herbs/Spice (optional - choose your favorite )

How To
1. Wash potatoes.  Remove any eyes or bad spots.  You can peel your potatoes or leave the skin on.  Most often we make skin-on potato fries.
2. Cut the potatoes into fries.  I find the easiest way is to cut the potato in half  then cut the half into three or four strips.  


3.  Preheat oven to 425 F.
4.  In a bowl, toss the cut fries with the oil, salt and herbs/spices.  Our favorite spice to use is paprika.  We sometimes add pepper, garlic or dried parsley.  Try different herbs/spices to jazz up your oven fries and complement your meal.


5. Turn out fries onto a lined baking sheet. We use a washable silicone liner, but you can also use wax paper or parchment paper.
6.  Bake at 425 F for 45 minutes.  Flip the fries every 15 minutes to ensure even browning on each side.  Fries can be cooked for up to 1 hour.  This will add crispiness.  Any longer and they will be hard and crunchy.


 7.  If you have other foods to cook in the oven, slide them in above the fries.  The fries will still crisp very well.  Our favorite is to have chicken and cubed squash with our oven fries.


Chicken thighs, cubed butternut squash and oven fries all cooking together at 425 F.


Eat and Enjoy!

You just can't beat Best-Ever Oven Fries.
Yum-Yum!

Happy thoughts,
Andrea


Please leave any questions/comments below 

God bless! 

Monday, 22 February 2016

How To Freeze your Spending - Week Three


Welcome to the weekly Spend-Freeze update.  On February 1st 2016  I posted what a Spend-Freeze is all about.  I outlined the rules we will strictly follow for the rest of the month.  The purpose is to stop our needless spending and save money. 


Week three

This week we're running out of many things.  Important things.  We're low on toilet paper, ketchup and eggs.  We've run out of apples, celery, lettuce and broccoli.  When we're nearing the end of a jar (mayo, yogurt, peanut butter, etc.) we're sure to use a spatula and scrape out every last drop.  This week I also cut open a plastic face cream container and toothpaste tube to get to the very last bits of each.


 My eldest daughter, Brooklynn, had her night light break.  My husband, Jon, had the idea of plugging in the iPod in her room.  He set it to "night light" for her.  She liked the idea.  I walked three times for errand this week to save gas.  I was really proud of myself as this week was very cold.  The warmest day was -15 C (or 5 F).  As I stated last week, we ran out of garbage can liners (I re-purpose store bags).  We went on a scavenge hunt through our house and found a few bags.  I also used the plastic from my daughter's diaper package to line the garbage can.


This week we had another birthday to celebrate.  It was Jon's sister.  We thought of creating something for her birthday.  It is harder to think of gift ideas for adults than for children.  There was also the constraint of her having to fit our gift on the plane home.  So we decided to give her "an experience".  My daughter Brooklynn has wanted to host a tea party for many months.  I'd previously bought fancy bone china tea cups from a local charity shop.   We used the fancy tea cups, white table cloth and birthday decorations to create a tea party fit for a queen!  A birthday queen.


Brooklynn and I worked hard making cookies and cakes for the party using ingredients from our pantry.

We invited Grandma, Grandpa, Aunty (the birthday girl), Daddy and Brother to the party.  Brooklynn selected a tea cup for each and had a selection of teas for them to choose from.


Everyone enjoyed the cookie decorating activity.  It was a very fun party!  We will definitely do that again.


A happy tea party goer.

Food

We're having to get creative now!  Our food supply is dwindling, but I'm still excited to finish out the month and see what we can come up with.

Monday - Pork Loin with cubed Potatoes and Butternut Squash
Tuesday - Pizza topped with leftover Bacon and Ham
Wednesday - Chicken noodle soup (using leftover chicken bones)
Thursday - Fried leftover Ham and Potatoes with Broccoli
Friday - Homemade Macaroni with leftover Ham (Pickles and Carrot sticks for veg)
Saturday - Beef Stew
Sunday - Pork roast and Scalloped Potatoes with Canned Corn and Green Beans

I received a comment from Megan asking what we do for breakfast and lunch.  Those meals haven't changed from what we ate previous to the Spend-Freeze which is why I didn't include them in our list.  We eat from our pantry fairly regularly - not just when we're on a Spend-Freeze.  I think our pantry may be larger than average.  I'm planning a post in March outlining what I purchase and how I organize our pantry.  But if you too are curious as to what we've been eating, here is what we do:

Breakfast
Most often we eat homemade granola cereal for breakfast (click here for that recipe).  Sometimes we'll have oatmeal, yogurt or peanut butter on toast.  I also like to have a protein shake for breakfast.  I am able to make everything using ingredients from our pantry.  The milk, yogurt and bananas (Which I use in my protein shake) are on our "allowed" list for weekly groceries.

Lunch
Our lunches are usually a mixture of leftovers and sandwiches.  I try to cook more food than we will eat at supper time so we will have leftovers.  I've heard it called "makeovers" when you purposely make leftovers.  Chicken and mashed potatoes the night before becomes a chicken sandwich with some fried potatoes at lunch time.  The only tricky part that comes with the Spend-Freeze is replacing some of the those sandwich staples (tomato and lettuce) with foods that come from our pantry.  Our solution:  pickles!!  They add crunch, juicy texture and deliciousness! Sometimes I'll make macaroni and cheese (click here for that recipe) from the items in our pantry and milk that we're allowed to purchase.

Brooklynn's school lunch

Sandwich with pickles.  Yum!


A Surprise

My husband has a great benefit plan through work.  Really really great.  If you have benefits through work, you likely have prescriptions and some medical procedures covered.  As do we.  My husband has an additional "Health Spending Account".  The purpose of this benefit is to encourage the purchase and use of items that will prevent the need for prescriptions and medical procedures.  It covers things like vitamins, exercise equipment, sports team fees, etc.  Taxes and all! Jon found out this month that he still had money left in the account and needed to spend it before the end of this month!  His benefits year ends on the last day of February.  Any unused money simply disappears.  It doesn't carry over into the next benefits year.  So.   We needed to spend money to save money.  Crazy!!  We decided to buy some 35 lb plates for bench press, free-weights (hand held weights pictured below), protein powder and protein bars.  My husband picked up his old weight training bar from his parent's house and has set it up in the basement.  We're rearranging things (our junk!) to create a nice little workout area down there.  I love doing workout videos so we'll be moving the kids small tv (which they rarely use) down there too.  Such a fun little surprise and change of focus on our Spend-Freeze month.

Freebies


Cheating

This month there was definitely a cheat.  By Jon.  Not me. That's right.  I'm throwing him under the bus!  He said he found some change in his pocket so it didn't count towards our Spend-Freeze.  He went with Brooklynn to the dollar store and bought her a new nightlight (hers had broken) and a bag of chips.  A small cheat.  But still.  A cheat!  Boo!!


We are Rich

We are currently running out of ketchup.  I told my son not to take too much since it was all we have (there is no more in the pantry).  My son said it made him feel poor to have so little ketchup.  That is when Jon and I had to remind him that we are so rich!  We have a warm house.  We have food in our bellies.  We can freely attend church without persecution or risk.  We live in a safe neighbourhood and have a home filled with furniture and clothes and toys.  We are rich!  It's easy to be focused on what we don't  have.  There are a ton of things we don't have.  A store full!  It's harder to see and appreciate what we do have.   Only when you take away the ability to acquire more can you truly understand how much you have.  I think sometimes that is the trick that Satan likes to play on us.  He likes us to be discontent.  He likes us wanting more and more things.  It takes our focus off the important things:  family, friends, others, and God.   If we can keep our focus on what's truly important, we will never suffer discontentment.


This is our second Spend-Freeze.  And just like our first, we reap so many benefits.  More than just saving money.  It gives us clarity of vision.  A step back from consumerism and a step towards people and God.  I love it!  And highly recommend a Spend-Freeze to everyone.  Especially you.  *smile*

Happy thoughts,
Andrea

Please leave any questions/comments below 

Saturday, 20 February 2016

Cleaning Series: How To Clean your Bathroom - in Ten Minutes!


Cleaning the bathroom.  It needs to be done.  It always needs to be done!  I don't love cleaning my bathroom but I do love having a clean bathroom.   I LOVE when my bathroom fixtures sparkle! *dreamy grin*

Previously I would spend half an hour or more cleaning my bathroom each week.  Yikes!  And I have more than one to clean!!  It felt like I was never able to keep up with the bathroom filth.  I was spending so much time cleaning them and yet they always seemed dirty!  So, I finally stumbled upon the solution:  a plan and a time limit!   Following the plan was tough at first.  I'm naturally forgetful.  But after implementing and following this plan over several weeks, I can now clean my bathroom in under 10 minutes.

Here's how:


The Philosophy

Have a plan of attack!  Clean high to low; cleaner to dirtier (as much as is possible).
Have a start plan and an end plan and an easily-flowing-plan in between.  Use a timer to track how long (or how short!) you clean.  Not only will it help keep you motivated to finish quickly (in less than 10 minutes) but I think it makes cleaning fun by turning it into a game.  A game of beating the clock!


The Supplies (ABCD...)

Gather these before you begin cleaning.  Store them together if possible.  The best place is underneath the bathroom sink.  My bathroom cupboard is too small so I keep my cleaning supplies on a shelf in the hall closet.


Abrasive Cleaner (homemade - recipe found here - or store bought)
Bucket
Cloth/sponge/rag
Dish soap
Gloves (optional - I always clean with gloves)
Hand towel (a clean new one to replace the old dirty one currently hanging in the bathroom.  We will be using the old dirty one to aid with our cleaning)
Mop (if you have a large bathroom)
Squeegee (optional - I find it to be the best tool for cleaning glass and mirrors)
Timer
Toilet brush
Toothbrush (an old discarded one)

Fill your bucket and let's get started!


The Plan

Remove the old dirty hand towel and replace it with the clean new hand towel.  Squirt some dish soap into your bucket.  Fill it half way with warm water from the sink or tub.  Set 10 minutes on your timer.  Press "Start".  Let the games begin!


In 3 Minutes
1.  Dip your cloth in your soapy bucket water.  Clean the mirror and window glass (if needed).  Use your squeegee/old hand towel to dry away any water spots.


2. Wipe down all surfaces.  Start high and end low.  Clean light fixture, shelves, picture frames, hooks, window ledge, chair rail, any decorative items and the visible sides of the tub. (We will not be cleaning the tub itself in our 10 minutes.  It's a task unto itself!) Rinse your cloth out in the soapy bucket water as needed. 


3.  Wipe down the bathroom cupboard fronts and handles.  Rinse cloth.  Wipe dry with the old hand towel.


4.  Wipe clean the light switch and plate.  Rinse cloth.
5.  Wipe clean the door handle, door and trim at hand level.  Rinse cloth.

Our home was built in the 50's and still has the original door handles.

In 3 Minutes
Whew!  That first 3 minutes went by lickity split!  You got this!!
1. Shake some abrasive cleaner into the sink.  Wet the old toothbrush under the faucet.  Dip into the cleaner and scrub around the drain hole and faucet.  Use your cloth and remaining cleaner to wipe down the rest of the sink and other objects (soap dispenser, toothbrush holder, mouthwash decanter, etc.).  Rinse out the cloth in the sink.  Wipe down all surfaces again to wash away any remaining abrasive cleaner.  Rub the faucet and knobs with the old hand towel until it sparkles.


2. Repeat step 1 if you have a second sink.
3. Wipe down any other items you may have in the bathroom.  For us that means the stool, child toilet seat and potty.  Rinse cloth in bucket.


4.  Wipe out garbage can if you choose.  Rinse cloth.

In 1 Minute
1.  Wipe down the toilet tank cover and sides of tank.  Rinse cloth.
2.  Wipe down toilet handle and behind the toilet seat.  Rinse cloth.
3.  Wipe the top of the toilet lid.  Open lid and wipe the inside of lid.  Rinse cloth if needed.
4.  Wipe toilet seat.  Leave cloth in bucket. 
5.  Lift toilet seat.  Sprinkle in abrasive cleaner.  With a toilet brush, scrub the underside of the toilet seat, inside the toilet bowl, and under the toilet bowl rim.  Rinse toilet brush in toilet water.


In 3 Minutes
You're down to the last 3 minutes!  You can do this!!
1. Throw Place the old hand towel, cleaners and other cleaning tools outside the bathroom door.  
2. Taking the cloth from your bucket, wipe the floor around the toilet.  Wipe the foot and sides of the toilet.  Wipe under the front bowl of the toilet.  Rinse cloth as needed.

I was cleaning so quickly this shot is blurry!
3. Wipe the floor behind the door in the bathroom.


4. Wipe (or mop if you have a large bathroom) the rest of the bathroom floor starting at the end farthest from the door.  Back your way towards the bathroom door, wiping the floor as you go.

I like to clean my floors by hand.  I'm "Type A" that way.

 And Done!


Did you do it!?  Did you win!? 

Gorgeous!
Well done you!! Congratulations if you beat the 10 minute clock! What do you plan to do with all those extra minutes you won? If you didn't win, at least you have a clean bathroom.  Your bathroom may be larger than mine and so you'll need 12 or 15 minutes to get it all done.  The key to speed is cleaning frequently and repeatedly.  You'll get faster each time.  The good news is: you get another chance to try and beat the clock next week!

Happy thoughts,

Andrea

Please leave any questions/comments below 
God bless!