Friday, 30 October 2015

How to Make Strawberry Topping


My oh my.

Strawberry topping!


                                                            I love love love strawberries!
And making this strawberry topping is quick and easy
and makes all things good.


This topping can be used for sundaes, banana splits,
yogurt, pound cake, cheesecake, and even on pancakes.
Of course it's not limited to this list.
I'm sure there are many many more opportunities for this delicious topping.
Straight out of the pot perhaps?
Perhaps. *wink*


Strawberry Topping

Ingredients
2 cups Strawberries, coarsely chopped and hulled
1/2 cup Sugar
1 1/2 tbsp Potato starch (or 2 tbsp Corn starch)


How To
1.  Combine all ingredients in a medium bowl.


2.  Let sit 5 minutes.  This will draw the juices out of the berries.


3. In medium pot bring berries, including all juices, to a boil on medium heat.   
Stir occasionally.  Increase stirring as topping thickens.


 4. Remove from heat and let cool.  May be served warm or cool.  
 Will store in a refrigerated container for one month. 


And if you're going to make some strawberry topping,
you might as well make some mini cheesecakes to go along with it!

See you again soon!
*Big smile*

Happy thoughts,
Andrea

If you would like to receive regular blog updates
be sure to "Like" my Facebook homepage here:


Monday, 26 October 2015

How to Make Pancakes from Scratch


Breakfast!

My favorite meal of the day!!

Even when it's not breakfast time
 I love breakfast food.
We have pancakes for supper every other week or so.
It's a quick meal that takes little effort
and is always eaten enthusiastically!
*" You know what I'm talking about" head nod*  


 I find pancakes fantastic for Fall.
Who am I kidding?  They're fantastic ALL the time!!
The recipe is so simple you'll be making them all the time too.
Adding apples or pumpkin puree to the pancake batter
 is a simple and easy way to add fall flavor to this recipe.


Pancakes  From Scratch -  makes 15 pancakes at 4" diameter
(We are very close to needing to double this recipe for my young family of 5)

Ingredients
3 tbsp Oil (I use canola)
1 Egg

3/4 cup Milk
3/4 cup Water
1 tsp Vanilla

1 1/2 cup Flour
3/4 tsp Salt
2 1/2 tsp Baking powder

1/2 cup Fruit, peeled and pureed or chopped (optional)
We love adding apples and a dash of cinnamon to this recipe.  But really any fruit will work. Feel free to experiment!  And let me know how it turns out. *smile* 
Note: Berry fruit will change the color of the pancake to the color of the berry.  And bananas bits in the pancakes will turn black if you have any left over and refrigerate them.

How To
1. Place a large non-stick frying pan on medium high heat to warm.
2. In a large measuring cup, or bowl with spout,  whisk together oil and egg.


3. Whisk in milk, water and vanilla.
4. Shake flour, salt and baking powder across the top of the wet ingredients.  Whisk in.


5. Optional - add fruit.
6. Let batter sit 2 minutes to thicken.
7. Pour approx. 1/4 cup of batter into frying pan.  Create as many pancakes as will fit in your pan.  Flip pancake once large bubbles appear in the batter.  Cook 1 minute more.  Remove from pan.  


8. Serve delicious pancakes, from scratch, and serve with wonderfully pure maple syrup!


                                            Filling my belly with yummy warm pancakes
and local maple syrup always makes me happy. *Big grin*
Come back and see me again soon for more
wonderful Fall recipes.


Happy thoughts,
Andrea

If you would like to receive regular blog updates
be sure to "Like" my Facebook homepage here:


Friday, 16 October 2015

How to Make Sweet Potato Pumpkin Pie


Pumpkin pie and Fall just go hand in hand.
After Halloween I like to roast our decorative pumpkins
and make delicious pie.
(Of course I save some pumpkin for Thanksgiving!)


But after Thanksgiving....
even better!!


Simply by adding leftover sweet potato,
pumpkin pie becomes... Sweet Potato Pumpkin Pie!
And it is oh-so-good!

A simple twist on a perennial favorite.
I love that it uses up leftovers in a really fantastic way.
Pie!!!

My kids love the addition of the sweet potato.
Maybe because they don't even notice it.
*wink*

Sweet Potato Pumpkin Pie

Ingredients
1 cup Pumpkin puree (8 oz) - If from a can, be sure it is not spiced.
1 cup Sweet potato puree (use as much as you have leftover - as long as the combination of pumpkin and sweet potato puree equals 2 cups)
2 tbsp Oil (I use canola)
2 Eggs
3/4 cup Milk
2 tbsp All-purpose flour

1/2 cup Sugar
1/4 cup Brown sugar
2 tsp Cinnamon
1/2 tsp Ginger
1/2 tsp Salt
1/4 tsp Ground cloves
dash of Nutmeg

How To
1.  In a large bowl whisk together the first 5 ingredients.


2. Whisk in the remaining ingredients.
3. Pour into a raw pie shell (click here for my easy pie shell from scratch).


4. Turn oven to 425F.  Bake for 10 minutes at that temperature.  Without opening oven, reduce the temperature to 350F.  Bake 40 minutes more.
5.  Remove pie from oven once the center appears set (no longer liquid).  Cracks may appear once cooked.  A toothpick inserted will not come out clean.


Oh. So. Good!

I love the heavenly aroma of the spices blending together as the pie cooks.

Serve warm or cold.
Serve plain, with whip cream or a la mode.
Always good.

Leftovers.
Who knew?

Happy thoughts,
Andrea

If you would like to receive regular blog updates
be sure to "Like" my Facebook homepage here:

Monday, 12 October 2015

How to Make Simple Pie Crust


I love this recipe!
From Scratch.

This always works perfectly.

Though I have found it greatly depends on the ingredients.

I'm a penny pincher and am always looking for different ways to save a few cents here and there. 
   An easy, and daily, way to save is on groceries.
So if I can save a few cents on pie crust.  Why not?
And that is precisely what I do.
Sorry Crisco.  Sorry Tenderflake.  Shortening will not work.
Only the cheap store-brand lard will do!
*wink*

Easy Pie Crust - makes a double pie crust

Ingredients
1 cup Lard (the cheaper the better!)
2 cups All purpose flour
1/2 tsp Salt
1/4 tsp Sugar

4 tbsp Water


How To
1. For best results refrigerate lard for half an hour or more.  Cube lard.
2. In a medium bowl blend lard, flour, salt and sugar with a pastry knife (pictured below)
or cut in with two knives.

My pastry knife.
 3. Once mixture resembles coarse meal add the 4 tbsp of water.  
 An extra tablespoon of water may be added if mixture too dry.


4. Knead mixture together by hand until ball created.
Pinch lard between your fingers to blend well into flour.

5. Divide dough into two balls (one slightly larger than the other).
Roll dough to create the bottom crust.
 Follow the steps here if you need instructions for rolling the dough.


 6. Once pie shell is filled, roll remaining dough to create the top crust.
Pinch bottom and top crusts to prevent filling from leaking.
Cut several slits in top crust to allow the filling to vent steam while cooking.
Follow the baking instructions for the filling.

If the filling did not include baking directions, follow these:
Bake at 425F for 15 minutes then turn oven down (without opening)
to 350F for 20 minutes.

Click here for this delicious Strawberry Apple pie filling recipe.

                                                         Isn't that fantastically easy?!

I knew you could do it. *wink*

Happy thoughts,
Andrea

If you would like to receive regular blog updates
be sure to "Like" my Facebook homepage here:


How to Make Mini Cheesecake


These are completely (almost entirely) from scratch!

I am very proud of this recipe!!

It is a simple recipe (with few ingredients),
it's easy (SO not difficult)
and oh so good (yes, yes, YES!!).


You can eat these minis plain, top them with fresh fruit, pie filling or (my favorite) homemade strawberry topping.  Click here to find that recipe!

I like to buy my cream cheese on sale, usually around Christmas time, and freeze it.
Cream cheese freezes really well.  And if you forget to take it out of the freezer don't worry!  You can start this recipe with a frozen block of cream cheese.  You won't notice any difference.  *nodding head with big reassuring smile*

Ingredients
1 cup Graham cracker crumbs
2 tbsp Sugar
3 tbsp Butter, melted

2 packages of Cream Cheese, each pkg is 8 ounces 
1/2 cup Sugar
1 tsp Vanilla

2 Eggs

How To (makes 16)
1. Combine first 3 ingredients in a bowl.  Mix well.  Line a muffin tin with paper cups.  Scoop a mounded tablespoon of mixture into each cup.  Press down firmly.


2. Unwrap cream cheese and place in a medium bowl.  Soften cheese by putting it in the microwave for 30 seconds.  Keep cooking, 30 seconds at a time, until soft enough to poke a fork through.

To make using the electric beater easier, I often beat the cream cheese with a fork before adding the sugar. 
 3. Add the half cup of sugar to the soft cream cheese and beat together with an electric mixer.
4. Add eggs one at a time.  Continue beating until well combined.


5.  Pour the cream cheese mixture into the muffin cups (approximately 1/4 cup of batter per cup).


6. Bake 325F for 25 minutes.  Let cool in pan.  Remove and chill.

They will look puffed and have cracks when done cooking.
 7. Top with fruit, chocolate sauce or keep it plain.  

 
 These are truly fantastic!
I wish smell could travel through photos.
These are heavenly!

Remember to bookmark this recipe.
I know you and your family will want to make these
over and over again.


Happy thoughts,
Andrea

If you would like to receive regular blog updates
be sure to "Like" my Facebook homepage here:


Friday, 9 October 2015

How to Roll Pie Crust


Oh pie crust!
You were my nemesis for a long loong time.
But now we have become friends.
Awe! *Eye flutter*


Learning to properly roll a pie crust took time
and patience
and some careful observation.

My Gram (short for Grandma) is a Master pie maker.
If you were to carry on a conversation with my Gram,
 at the end of it two pies will suddenly appear.

How did she do that?!

Can you make two apple pies
while maintaining a conversation
and eye contact with someone!?!?

THAT is why she is the Master.

So I am sharing the crust rolling secrets of my Super Gram
in this How to Roll a Pie Crust Tutorial!
(And LOTS of pictures!)

Step 1: Make dough for a double pie crust.  If you only need a single
pie crust follow to step 9 then jump over to step 15 to complete.
Divide the pie dough into two balls, one slightly larger than the other.
*Insert husband's joke here*


Step 2: Generously flour your rolling surface.
 You will use close to one cup of flour in the rolling process.
I like to fill a measuring cup with flour and take small
pinches of flour from it as needed.


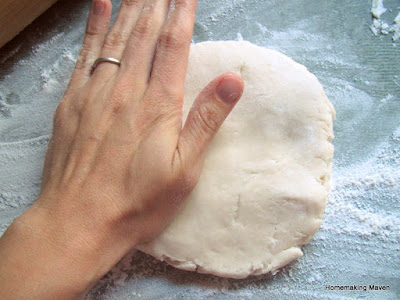
Step 3:  Squish the smaller ball of dough, using the heel of your hand, into a large oval shape.


Step 4: Generously flour your rolling pin.


 Step 5: Firmly and smoothly roll your pin away from you across the dough oval.
Turn the pin 90 degrees and roll again.


Step 6:  Lift the rolled dough, re-flour the rolling surface underneath, and flip the dough over.
(Flip only once.)


Step 7: Continue rolling, alternating direction, until the dough is slightly larger than the pie plate you will be using to bake your pie.  Re-flouring the rolling pin and surface as needed to prevent sticking.


Step 8: Once the desired pie shell size is achieved, place the rolling pin on one edge of the rolled dough.  While holding the dough on the pin, slowly roll the pin across the dough.  This will roll the dough onto the pin allowing you to lift it high enough to place the pie plate underneath.


 Step 9:  Trim the bottom pie shell to the size of the pie plate.
(Now is the time to fill bottom pie shell with desired sweet or savory filling.)
  
Click here for this Strawberry Apple Pie recipe.


Step 10:  Roll the second ball of dough in the same manner as the first ball (steps 2-7).
The second dough ball, being larger, will roll much larger than the first.   
This is needed to completely cover the pie filling.


Step 11:  Following Step 8, roll the dough onto the pin and place over the filled bottom pie shell.


Step 12: Trim the top pie shell leaving a 1" (one inch) over hang.


Step 13: Lift the edge of the top shell and tuck into the pie plate.  Press down to seal it with the bottom crust.  I like to also press a fork along the edge as I think it looks pretty.  But that is not necessary. 


Step 14: Using a knife cut small slits in the top shell to allow the pie to vent steam while cooking.


Step 15: Follow the pie filling baking directions.


You did it!  You rolled your very own pie crust!!
                                         Well done you!  You deserve a slice of pie. *wink*

Happy thoughts,
Andrea

Please leave any questions/comments below 
God bless!