I should add to today's blog title "with no money!". Or "for cheap!" as we are currently on a Spend-Freeze (click here to read more about that). As it sounds, we can spend no money for this month. We had planned on hosting our son's birthday in January (which is his birthday month) but life's unplanned moments kept cropping up. Thus causing his party to be pushed into February. But since we'd been planning a Minecraft birthday for a while, we had stockpiled supplies. So, how did we do it?
What is "Minecraft"?
For those who are unfamiliar with Minecraft, here is my definition:
It is a very popular video game played via a first person view. You are the main character (also called "Steve"). It can be played by one or multiple players at a time. The world of Minecraft is
pixelated; meaning everything in the world is square. Food is square, trees are square and even your Steve is square. You start the game with just your Steve and must acquire all the things you need for your Steve to survive. You must mine wood (from trees), stone, metals (from the ground) and food to eat (from animals or plants). You can then take your mined materials and craft different objects (pickaxe, swords, house, backpack, etc). Hence Mine-Craft. Get it? But you must beware. While you are mining and crafting there are "bad guys" about. There are many but the most frequent are zombies, skeletons, spiders and creepers. These are killed relatively easily but they will take your health (indicated by 9 red hearts).
This long definition will make sense when we get to the food and games section of our party planning.
Invitations
The rule in our house is that you can invite as many people
as years old you are. Our son turned 7
so he invited 7 boys. This is alot of
boys! Thankfully we knew that many of
the boys had hockey commitments and there was a chance they would not be able
to come. We had 4 boys attend the party.
(Whew!) Our party was on a Saturday and ran from 10 am until 1 pm.
There are many ways to create your own invitations.
1. The easiest way is to create a Facebook event page or
mass email and send electronic invites to the parents of all the kids invited.
2. The second easiest way is to fold a piece of paper in
half and draw some squares. Draw some
dirt squares, water squares, pig squares and a Steve. Add party info and done.
3. The third easiest
way is to search "Minecraft" images and print the ones you like. Glue them to the front of a folded paper, add
party info and done.
4. The fourth easiest
is to have a card making program. Mine
is an old CD-ROM and cost me $5 over 10 years ago. A very good investment I think! I found some images online and copied them
onto the invitation. Add party info and
done.
5. The fifth easiest
is to search the internet for ready-made invites. Download.
Add party info, print and done. I found a site for great invites called Frugal Family Times. They have links to the invitation they used and others that can be downloaded.


Party Decor
Decor was simple at our house. I have the same birthday banners bought over 10 years ago. (Most of the
birthday items we use were bought back when it was my husband and I were
newlyweds. We both worked full time and
had lots of disposable income back in the day. And loads of room in our house for "stuff".)

I also decorated with some streamers I purchased last month from the dollar store. I printed some photos of Minecraft characters and taped them to frames already hanging on the wall (Click here to view Minecraft images or simply type "Minecraft images" in your search engine). I decided not use a tablecloth as our dining room table is made out of square tiles. Perfect for our theme! And finally, I put up the birthday cards Jackson had already received from family. They were square shape and looked great.

I also decorated with some streamers I purchased last month from the dollar store. I printed some photos of Minecraft characters and taped them to frames already hanging on the wall (Click here to view Minecraft images or simply type "Minecraft images" in your search engine). I decided not use a tablecloth as our dining room table is made out of square tiles. Perfect for our theme! And finally, I put up the birthday cards Jackson had already received from family. They were square shape and looked great.

Food
Jackson wanted all foods at his party to be food from the Minecraft game. In Minecraft all food is square and there are only certain foods that can be eaten. Thankfully the list is fairly long. I tried to choose a variety from all four food groups and foods that I could make look square. I did make a salsa dip and use crackers which are not in Minecraft. I wanted an appetizer that the boys could eat whenever they were hungry. And I made it look square so I decided it was okay. We served the food on square napkins and from square bowls that we had on hand.
 |
| Square Crackers with a Square Cheese and Salsa Dip |
Lunch Menu
Carrots
Apples
Watermelon
Sandwiches - from square bread using cubed chicken or cubed beef with square lettuce. Cheese and tomatoes are not Minecraft food. Though I did add mayo or mustard if the boys wanted some.
Apple Juice - served in juice box form (square). Juice is also not a Minecraft food. Only water. But I was sure my son and his friends would rebel if I gave them only water to drink at the party. (I have since seen a Steve drink cactus juice. You could make lime-aid or green juice from crystals and call it cactus water.)
 |
| Square Sandwiches on square napkins |
 |
| Cubed watermelon, apples and carrots in square bowls. |
Games
We created a real-life version of Minecraft. It certainly would have been easier to have all the kids play the video game but we only have it downloaded to our iPad. Five boys sharing an iPad would not have worked well. Also, we knew some of the boys had never actually played the video game before. A live version would be easy to play and understand.
Supplies (We made these ahead of time ourselves)
Cardboard masks - made by cutting up cereal and cracker boxes. They were held on by a cut elastic taped onto the mask. Each boy had a Steve mask. My husband had a spider and skeleton mask.


Cardboard pickaxe - made by cutting up a cardboard box. The boys coloured their own pickaxes. In the game they can be made from wood, stone, diamonds, emeralds, rubies, etc.


Red construction paper hearts - representing the health of their Steve. Each boy had 5 hearts which were taped the front of their shirts.

Lego blocks, Jenga blocks and wooden building blocks - these represented the items that they mined and crafted with.
Stool with mapped outline - this represented a crafting table.


Game Outline
Each boy had their own mask (which they coloured), pickaxe (which they coloured) and inventory. We scattered Jackson's blocks all over our playroom. The goal was for the boys to go into the play room and pretend to mine blocks using their pickaxes and fill their inventory. They then came back to the kitchen table and created swords or houses or whatever they wanted. If they were able to create a full sword out of Lego blocks and find two wood blocks, they could go to the crafting table (the stool) and receive a "real" sword (which were foam swords we still had leftover from Jackson's 2nd and 6th birthdays).

A sword was needed! There was a danger when they went into the play room to mine for blocks. A spider! Or a skeleton! Both were played by Jon. He would wear his "bad guy" mask and enter the room to steal the boys paper hearts. He often only got one or two before they all attacked him with their swords. They loved that part of the game!

A sword was needed! There was a danger when they went into the play room to mine for blocks. A spider! Or a skeleton! Both were played by Jon. He would wear his "bad guy" mask and enter the room to steal the boys paper hearts. He often only got one or two before they all attacked him with their swords. They loved that part of the game!
Once the boys had collected all their desired blocks, we had a building contest at the table. Some of the boys worked in pairs. Others worked on their own. They created homes with yards and weapons and traps. They had great fun!


Gifts
In the invitations we sent out I wrote "Gifts not necessary. Homemade gifts encouraged."
I have written this in every invitation since we started having parties. The reason is threefold:
1. I don't know the economic status of all the boys invited. I don't want the parents to feel they need to spend their last $20 on buying my kid a gift. The goal of the party is for Jackson to have fun and celebrate his birthday with his friends, not for him to receive as many gifts as he can.
2. My kids don't need more gifts. They are spoiled already!
3. I love seeing what gifts kids can make. And I think they're the best gifts too. They require time, effort and imagination. I love it!
We did not wrap Jackson any gifts for this party as we had given him all his gifts on his actual birthday in January. This saved us from having to purchase him one on our Spend-Freeze month.
The boys gave Jackson some fantastic homemade gifts! My favorites were a Chewbacca bookmark (made from cut foam) and a wooden Creeper statue.


Cake
There are cakes in Minecraft. They look like this (white with red square spots). I was planning on creating a traditional chocolate cake but Jackson asked for green icing. He wanted the cake to look like a Minecraft earth and grass block. I was going to simply bake a square cake with green icing but then I saw the cake created by Frugal Family Times and copied their design idea. Thanks guys! I think Jackson was really impressed. The Steve mini-fig on the cake was made from a free paper printout found here by Pixel Paper Craft. (This printout and many others are found on the site by Frugal Family Times. Click here to check them out!)

 |
| Building the Minecraft cake. |
 |
| Building the Steve mini-fig. |

The chocolate cake was delicious! It was thick like a brownie and very chocolaty. This recipe was different from your average cake recipe as it was egg-free. This was a perfect recipe for us to use during our Spend-Freeze (as our rules limit us from buying eggs this month) and perfect for Evalynn as she has an egg allergy. I halved the recipe and added 1/2 cup of chocolate chips to the batter. The recipe was posted to the site Allrecipes by Amy Parsons and can be found by clicking here. Everyone had second helpings of cake. Yum! Yum!!

Loot Bags
It was tricky creating loot bags during out Spend-Freeze month. Thankfully I had several empty loot bags leftover from previous years. I also have a collection of small toys that I add to throughout the year. Toys that would do well in a loot bag, surprise bag or a child's stocking. I chose two toys and a noise maker from the toy collection for each bag. I also printed a copy of the paper Steve mini-fig for the boys to craft for themselves at home.

Instead of candy, the kids helped me create square cookies. They painted faces (of Steves, creepers, spiders and so on) on the cookies using cotton swabs dipped in food colouring. They had so much fun painting those cookies! We will definitely do that again!


Instead of candy, the kids helped me create square cookies. They painted faces (of Steves, creepers, spiders and so on) on the cookies using cotton swabs dipped in food colouring. They had so much fun painting those cookies! We will definitely do that again!

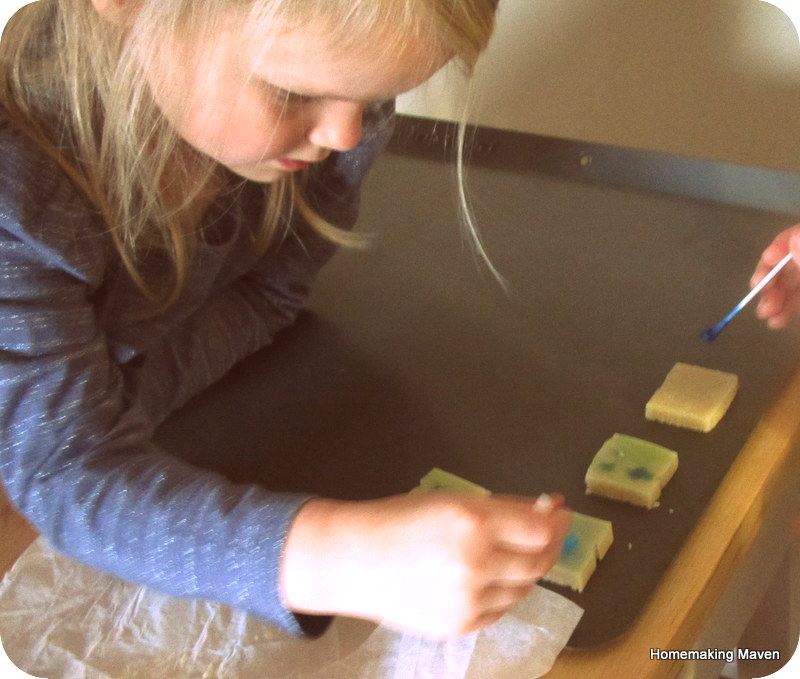 |
| Painting square cookies |
Having Fun!
 |
| Birthday boy, his sister, friends and a Spider (Jon) |
Jackson and the boys loved the party! We've heard nothing but positive feedback from the boys and their parents since the party. And now many other boys from Jackson's school want to come over and play at his house. Which is all great for Jackson (he is a very social boy who loves playing with others). We're glad we could give him a party to remember!
Happy thoughts,
Andrea
If you would like
to receive regular blog updates
be sure to
"Like" my Facebook homepage here: