Monday, 17 December 2018

Best Ever Hot Chocolate!


This recipe is so simple and easy.
There is even a very good chance you already have all the the ingredients you'll need on hand!

My kids LOVE this hot chocolate!  I love it because there are so few ingredients and I can make it in less than 5 minutes.  Perfect!

Ingredients
2 cups Milk -- any kind!  (We like rice milk)
2 cups Water
1/2 cup Sugar
Dash Vanilla
1/4 cup Cocoa powder

How To
1. In a medium pot over low heat, pour the milk and water in together.
2. Add sugar and vanilla to the pot and whisk.
3. Remove a 1/2 cup of mixture to a separate bowl.  Whisk in cocoa powder until dissolved.
4. Return cocoa powder mixture to pot.  Whisk.
5. Heat hot chocolate to desired temperature and serve.


You can always add a little pizzazz to your hot chocolate by using cream in place of milk or using expensive or exotic cocoa powders.

Remember to add whipped cream or marshmallows with chocolate shavings for a delicious topping to a delicious cocoa!

Check out my YouTube video all about it here:


Until next time!!

Andrea


Saturday, 10 November 2018

Eating for Victory! - Vintage Recipe 1


When Britain entered the Second World War against Germany, Britain knew they would need to change how they grew, distributed and consumed food or they would surely starve.  Having learned in the First World War how easily the ships they depended on for food imports could be destroyed.  In 1939 the Ministry of Food was created and in September 1939 national food rationing was instituted.  This ensured every Britain received their fair share.  These recipes were created by the Ministry of food to help housewives stretch, pinch, and use up every last drop or morsel of food available.  Nothing went to waste.  Everyone, from soldiers to housewives, the elderly to the smallest child, were fighting fit.  Everyone was in the fight.  Eating for victory!  


What to make for dinner? Isn't that always the question?!  I find  it a difficult question to answer in the present day when we have a large selection of choices.  We can even choose from a plethora of ready-meals.  We don't even need to set foot in the kitchen if we don't want to.  Now imagine you're living on war time rations.  What do you make now?


Thankfully the Ministry of Food created leaflets for all housewives to cope with just such a problem!  Whole weekly menus were created to take the guess work out of daily meals.  Many recipes, cooking methods, baking instructions and even how to create preserves were printed in these pamphlets.  Michael O'Mara Books Limited has compiled many of these leaflets in a wonderful book titled "Eating for Victory: Healthy Home Front Cooking on War Rations".  From the book I choose this midday meal.  It seemed easy enough to make.  It didn't take much time.  And I had the ingredients. (This pretty much sums up my decisions making process:  Do I have the time?  Do I have the means?) So I got started...


Fish and Potato Pancake
This recipe is from "Eating for Victory: Healthy Home Front Cooking on War Rations" by Michael O'Mara Books Limited (ISBN 978-1-84317-264-2)

Ingredients:
1 medium sized onion, finely chopped
1/2 oz. dripping or fat (I used some saved beef fat)
3/4 lb potatoes, cooked and sliced
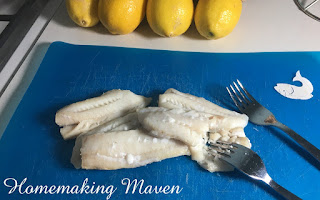
1 lb cod or any white fish, cooked and flaked
1 tsp vinegar
1 tsp salt
pepper
chopped parsley


Preparation:
Fry the onion in the dripping or fat until tender.  Add the potatoes and fish and fry until brown.  Sprinkle over the vinegar, salt, pepper and parsley.  Serve hot.


What my kids thought: they didn't really like it.  As expected.  The dish is heavy on onion and light on spice.  My kids did not enjoy the flavor of the dish and it did it go well with ketchup.  They tried.  But even my daughter who eats almost everything didn't want to finish it all.


What the adults thought: we liked it.  My husband and I ate all ours (and the kids'!).  I was surprised the "pancakes" were actually fried potato medallions, but I really enjoyed the fish.  It was flaked so you didn't get a huge mouthful of fish in each bite, but it had a crisp to it.  And it went really well the potatoes.  Of course!  Fish and chips is a natural combo!  This is like a one-pan throw-it-all-together kinda version of fish and chips.


In conclusion, my husband and I would eat this again.  It was tasty.  BUT. There was a fair amount of prep before hand.  Such as having the fish and potatoes already cooked.  I'm assuming this meal is actually meant to be a way to use up leftover fish or leftover potatoes.  That would save time on those steps.  I can see how during war time this meal would stretch the fish by accompanying it with the potato "pancakes".  However I would rather eat the potatoes on their own (as baked, mashed or as fries) and stretch the fish using batter or some other means.  So all told, we will likely not eat this, or make this, again.  I still had fun.  And I'm still very excited to try the next Vintage Recipe!

-Andrea

Sunday, 4 November 2018

Homemade Multi-Grain Bread


It has been many many moons since I've written a blog post, but I have received many requests for recipes and downloadable or printable media that I create over on my YouTube channel.

So.

It's time to start writing again!

And for my first entry (in a very long time!) we are going to dive headlong into the world of bread!

I absolutely LOVE making bread.  Which is a good thing because our family eats a lot of it! And not just because we like it, but because we recently expanded our family of 6 to a family of 7.  Yes.  We have a new addition name Magdalynn.  She is lovely and beautiful (and you will likely see photos of her inserted at random as she is just too cute not to photograph!) and we are so happy to have her in our family.


 But feeding our enlarging family can be a challenge!

Thankfully this bread recipe is simple, costs very little and makes four loaves at a time.  You can divide the recipe to create only one loaf or double it to create eight (if you have the space for all those loaves!), You can also substitute grains and add more grains if you 'd like.  The recipe is flexible.  Just the way I like it! *smile*


Watching the yeast proof

To proof the yeast, mix the dough, allow it to rise and bake the bread does take time.  It's best to make bread when you know you'll be home.  To save a small bit of time, I place my loaves in the oven to bake before even turning it on.  Yes!  I preheat the oven with the loaves inside!!  Crazy but true.  I find I get better loaf baking by having them already in the oven as it heats up.   

The bread is in the oven!
Can you still bake bread if you have a very busy schedule that keeps you out of the house most of the day?  Absolutely! I have started bread as late as 6 pm.  It'll still be ready before my bedtime at 1030 pm.  And who wouldn't want fresh bread for breakfast the next morning!??!

Waiting for the second rise
It's all worth it in the end.  You'll get lovely hearty loves that will satisfy hungry tummies and picky tastebuds.  Your home will also be filled with the smell of fresh baked bread.  Is there a better smell than that?  And if you top that fresh bread with homemade jam? Yummmmm!!!  Just heaven!

Four lovely loaves
Without further ado, here's how to create my Multi-Grain Bread:


Multi-Grain Bread
4 cups Warm Water (divided)
2 tbsp Active Dry Yeast
2 tbsp Salt
4 tbsp Oil (I use canola)
1/2 cup Bulgar
4 cups Whole Wheat Flour
2 cups All-Purpose Flour
1 cup Oats
3-5 cups All-Purpose Flour (amount will depend on consistency of the dough)

1. Using a Kitchen Aid mixer with hook attachment, divide the warm water between the bowl of the mixer and a second bowl.
2. Add the yeast to the mixer bowl and let it proof for at least 5 minutes.  Add the salt and oil to the second bowl.
3.  Pour the bulgar into a third smaller bowl and cover with water (any temperature) and allow it to sit 10 minutes.
4.  Pour the salt water from the second bowl in the yeast water of the mixer bowl.  Add the whole wheat flour and 2 cups of the all-purpose flour.
5. Optional: Turn on the oven (150 F or lowest setting) and allow it to warm.
6. Turn the mixer on, using the lowest setting.  Allow it to mix until the flour and water are well combined.
7.  Turn off the mixer.  Scrape sides of mixing bowl if needed.  Drain and add the bulgar to the dough.  Add the oats.  Add 3 cups of all-purpose flour.  Turn on the mixer (to the lowest setting) and allow all ingredients to combine well.
8. Turn off mixer and scrape sides of mixing bowl if needed.  Add more flour if needed.  Dough is done mixing once it forms into a ball and pulls away from the sides of the mixing bowl.
9.  Remove mixing bowl from mixer.  Cover dough with a damp towel and let rise 1-2 hours depending on room temperature.  (Option: Turn off oven and let dough rise in oven for colder climates/seasons)
10. Grease or line loaf pans with parchment paper, lard or shortening.
11. Spread a thin layer of oil over counter (I use canola) and remove risen dough from mixer bowl.  Scrape out any dough stuck to the side of the bowl with a spatula.  Flatten the dough on the oiled surface into a large oval.
12. Cut the dough into 4 equal pieces.  Roll the dough into logs, pinching and tucking the rolled edge on the bottom of the log.  Place each rolled log into it's own loaf pan.
13. Allow the loaves to rise a second time (Option: Rise in oven a second time for cold climate/seasons) for 1 hour.
14. Place all loaf pans in the oven.  Heat oven to 350 F with loaves inside.  Set timer for 35 minutes.
15.  Once baked, allow loaves to sit for 5 minutes to cool and shrink.  Then simply flip over loaf pans to remove bread loaf.  (Do not let the loaf to cool in it's pan.  It will get a soggy bottom!)  Allow loaf to cool completely on a cooling rack before placing it in a bread bag.  Loaf can be kept on counter for 1 week, in the fridge for 2 weeks or in the freezer for 2 months.